Intégration de l’authentification forte avec Yubikey dans JBoss
Yubikey est une clé de sécurité matérielle qui permet d’implémenter une authentification forte (2FA - Two-Factor Authentication) lors d’un processus de connexion à un site web ou une application (par exemple : services bancaires, webmail, applications d’entreprise, etc.). De plus en plus d’organisations intègrent cette technologie dans leur processus d’authentification pour renforcer significativement leur sécurité informatique.
Principe de fonctionnement
Le principe est simple mais efficace : l’utilisateur utilise un token à usage unique généré par sa clé Yubikey comme second facteur d’authentification. Ce token est cryptographiquement sécurisé, vérifié par le système, et change à chaque utilisation. Même si le token est intercepté par un attaquant lors d’une tentative de connexion, celui-ci ne pourra pas le réutiliser pour s’authentifier ultérieurement, ce qui renforce considérablement la sécurité du système d’authentification.
Objectif de ce tutoriel : Intégrer une authentification OTP (One-Time Password) via Yubico avec un serveur JBoss EAP ou Wildfly pour sécuriser vos applications d’entreprise Java EE.
Première étape : Préparer le matériel et l’environnement
Pour mettre en place cette solution d’authentification forte, vous aurez besoin des éléments suivants :
-
Une clé Yubico (disponible sur la boutique officielle)
- Solution testée avec YubiKey NEO-n
- Compatible avec d’autres modèles comme YubiKey Nano ou YubiKey Neo
- Chaque utilisateur devra disposer de sa propre clé
-
Un serveur d’application Java EE
Important : Cette implémentation utilise le service Yubico Cloud Service pour la validation des tokens. Par conséquent, votre serveur d’application doit disposer d’une connexion Internet pour communiquer avec les serveurs de validation Yubico et vérifier l’authenticité des tokens OTP générés par les clés.
Deuxième étape : Compiler le client Java Yubico
Pour intégrer l’authentification Yubico à JBoss, nous devons d’abord compiler le client Java officiel fourni par Yubico. Suivez ces étapes pour récupérer et compiler le code source :
# Cloner le dépôt Git du client Java Yubico
greg@a.net> git clone git@github.com:Yubico/yubico-java-client.git
greg@a.net> cd yubico-java-client

# Compiler le projet avec Maven
greg@a.net> mvn clean package

.... OMIT .....

[INFO] ------------------------------------------------------------------------
[INFO] Reactor Summary:
[INFO]
[INFO] Yubico OTP validation client ....................... SUCCESS [  0.003 s]
[INFO] Yubico OTP validation client protocol 1 ............ SUCCESS [  2.254 s]
[INFO] Yubico OTP validation client protocol 2 ............ SUCCESS [  3.798 s]
[INFO] Yubico JAAS module ................................. SUCCESS [  0.710 s]
[INFO] yubico-demo-server ................................. SUCCESS [  2.782 s]
[INFO] ------------------------------------------------------------------------
[INFO] BUILD SUCCESS
[INFO] ------------------------------------------------------------------------
[INFO] Total time: 9.704 s
[INFO] Finished at: 2015-03-01T16:42:11+01:00
[INFO] Final Memory: 39M/228M
[INFO] ------------------------------------------------------------------------
greg@a.net>
Une fois la compilation terminée avec succès, vous obtiendrez plusieurs fichiers JAR. Deux d’entre eux sont particulièrement importants pour notre intégration :
-
Client de validation OTP (protocole 2) :
- Fichier :
yubico-validation-client2-{Version}.jar - Rôle : Communique avec le service Yubico Cloud pour vérifier l’authenticité des tokens OTP générés par les clés Yubico
- Fichier :
-
Module d’authentification JAAS :
- Fichier :
yubico-jaas-module-{Version}.jar - Rôle : Fournit l’implémentation du module de login à intégrer dans le serveur JBoss
- Fichier :
Le module JAAS agit comme intermédiaire entre votre application JBoss et le service Yubico Cloud. Il utilise le client de validation pour vérifier les tokens et gérer le processus d’authentification.
Troisième étape : Créer le module JBoss pour Yubico
JBoss/Wildfly utilise un système modulaire pour organiser ses dépendances. Comme Yubico n’est pas inclus par défaut, nous devons créer un module personnalisé. Voici comment procéder :
- Créez un fichier
module.xmlavec la configuration suivante :
<?xml version="1.0" encoding="UTF-8"?>
<!--
  ~ JBoss, Home of Professional Open Source.
  ~ Copyright 2014, Red Hat, Inc., and individual contributors
  ~ as indicated by the @author tags. See the copyright.txt file in the
  ~ distribution for a full listing of individual contributors.
  ~
  ~ This is free software; you can redistribute it and/or modify it
  ~ under the terms of the GNU Lesser General Public License as
  ~ published by the Free Software Foundation; either version 2.1 of
  ~ the License, or (at your option) any later version.
  ~
  ~ This software is distributed in the hope that it will be useful,
  ~ but WITHOUT ANY WARRANTY; without even the implied warranty of
  ~ MERCHANTABILITY or FITNESS FOR A PARTICULAR PURPOSE. See the GNU
  ~ Lesser General Public License for more details.
  ~
  ~ You should have received a copy of the GNU Lesser General Public
  ~ License along with this software; if not, write to the Free
  ~ Software Foundation, Inc., 51 Franklin St, Fifth Floor, Boston, MA
  ~ 02110-1301 USA, or see the FSF site: http://www.fsf.org.
  -->
<module xmlns="urn:jboss:module:1.1" name="com.yubico">
   <resources>
     <resource-root path="yubico-jaas-module-3.0.0-SNAPSHOT.jar"/>
     <resource-root path="yubico-validation-client2-3.0.0-SNAPSHOT.jar"/>
     <resource-root path="vt-ldap-3.3.3.jar"/>
   </resources>
   <dependencies>
     <module name="org.picketbox"/>
     <module name="javax.api"/>
     <module name="org.slf4j"/>
     <module name="org.apache.commons.codec" />
     <module name="javax.security.jacc.api" />   <!-- pour utilisation future -->
     <module name="javax.servlet.api"/>          <!-- pour utilisation future -->
     <module name="org.jboss.common-core"/>      <!-- pour utilisation future -->
   </dependencies>
</module>
- Créez le répertoire du module et copiez les fichiers nécessaires :
# Créer le répertoire du module
mkdir -p $JBOSS_HOME/modules/com/yubico/main

# Copier le fichier de configuration du module
cp module.xml $JBOSS_HOME/modules/com/yubico/main/

# Copier les JAR compilés précédemment
cp yubico-java-client/jaas/target/yubico-jaas-module-3.0.0-SNAPSHOT.jar $JBOSS_HOME/modules/com/yubico/main/
cp yubico-java-client/v2client/target/yubico-validation-client2-3.0.0-SNAPSHOT.jar $JBOSS_HOME/modules/com/yubico/main/
- Récupérez et copiez également la dépendance LDAP nécessaire :
# Chemin typique dans le cache Maven local
cp ~/.m2/repository/edu/vt/middleware/vt-ldap/3.3.3/vt-ldap-3.3.3.jar $JBOSS_HOME/modules/com/yubico/main/
Astuce pour le développement : Si vous travaillez sur un système Unix (Linux, macOS), vous pouvez créer un lien symbolique vers votre répertoire de développement pour faciliter les modifications et le débogage :
# Au lieu de copier les fichiers, créez des liens symboliques
ln -s $(pwd)/yubico-java-client/jaas/target/yubico-jaas-module-3.0.0-SNAPSHOT.jar $JBOSS_HOME/modules/com/yubico/main/
ln -s $(pwd)/yubico-java-client/v2client/target/yubico-validation-client2-3.0.0-SNAPSHOT.jar $JBOSS_HOME/modules/com/yubico/main/
Quatrième étape : Obtenir les identifiants API Yubico
Pour que votre serveur JBoss puisse communiquer avec le service Yubico Cloud et valider les tokens OTP, vous devez obtenir des identifiants d’API spécifiques à votre application :
-
Rendez-vous sur le site officiel de Yubico pour générer vos identifiants API : https://upgrade.yubico.com/getapikey/
-
Remplissez le formulaire avec :
- Votre adresse email (qui servira d’identifiant)
- Un OTP généré par votre clé Yubico (en insérant votre clé et en appuyant sur le bouton)

- Après validation, vous recevrez deux informations essentielles :
- Client ID : identifiant numérique pour votre application
- Secret Key (aussi appelée Client Key) : clé secrète pour signer les requêtes
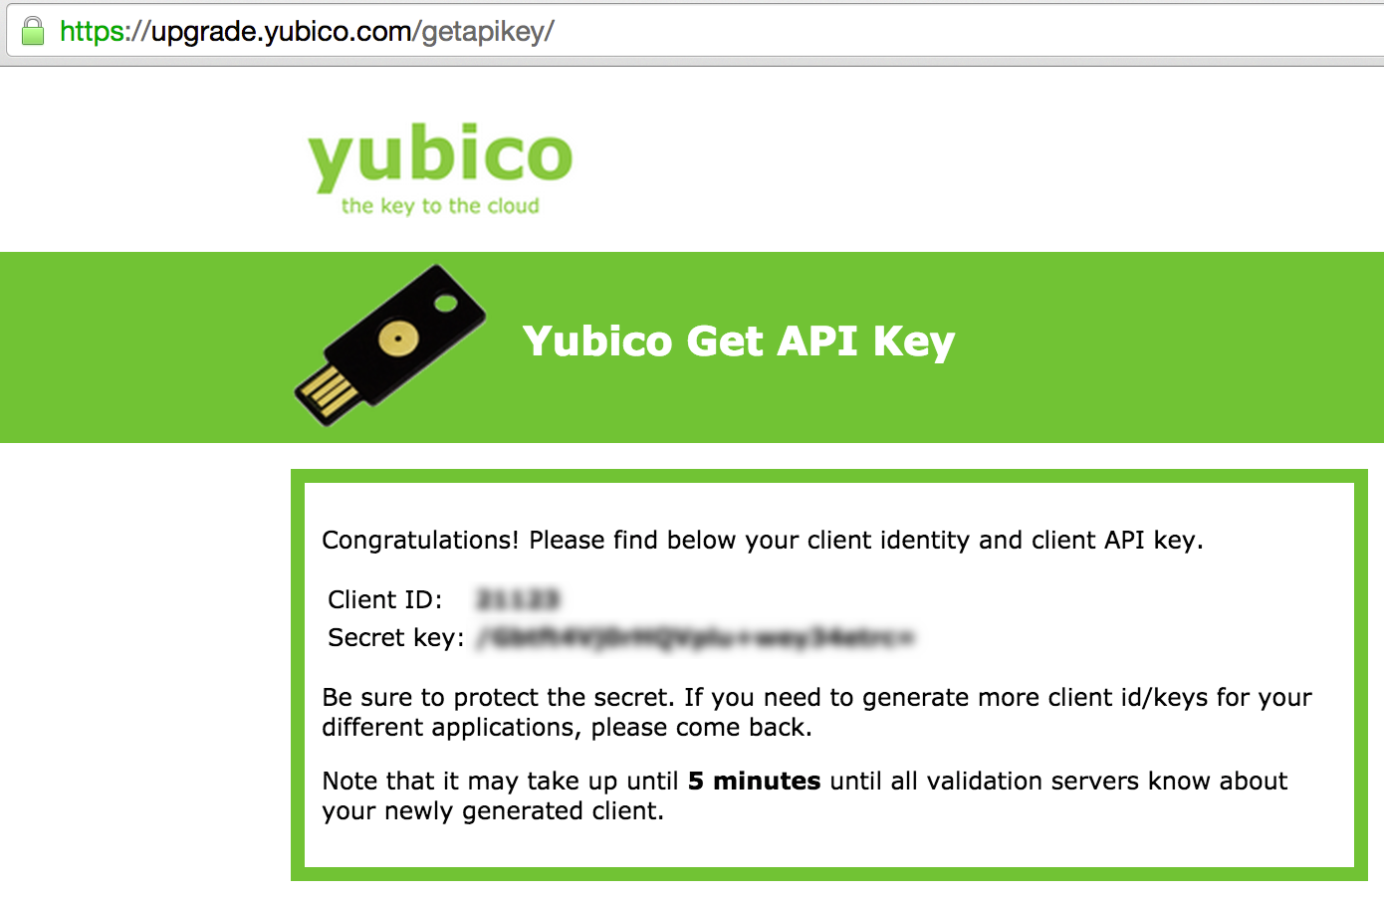
Important : Conservez précieusement ces informations d’identification. Elles seront nécessaires lors de la septième étape pour configurer votre instance JBoss et permettre la communication sécurisée avec le service Yubico Cloud.
Cinquième étape : Collecter les identifiants publics des clés Yubico
Pour associer chaque clé Yubico à son utilisateur légitime, vous devez collecter l’identifiant public (PublicId) de chaque clé. Voici comment procéder :
-
Demandez à chaque utilisateur de déterminer le PublicId de sa clé Yubico en utilisant l’outil de démonstration officiel : https://demo.yubico.com/start/otp/standard
-
L’utilisateur doit :
- Se rendre sur le site
- Insérer sa clé Yubico
- Appuyer sur le bouton de la clé pour générer un OTP
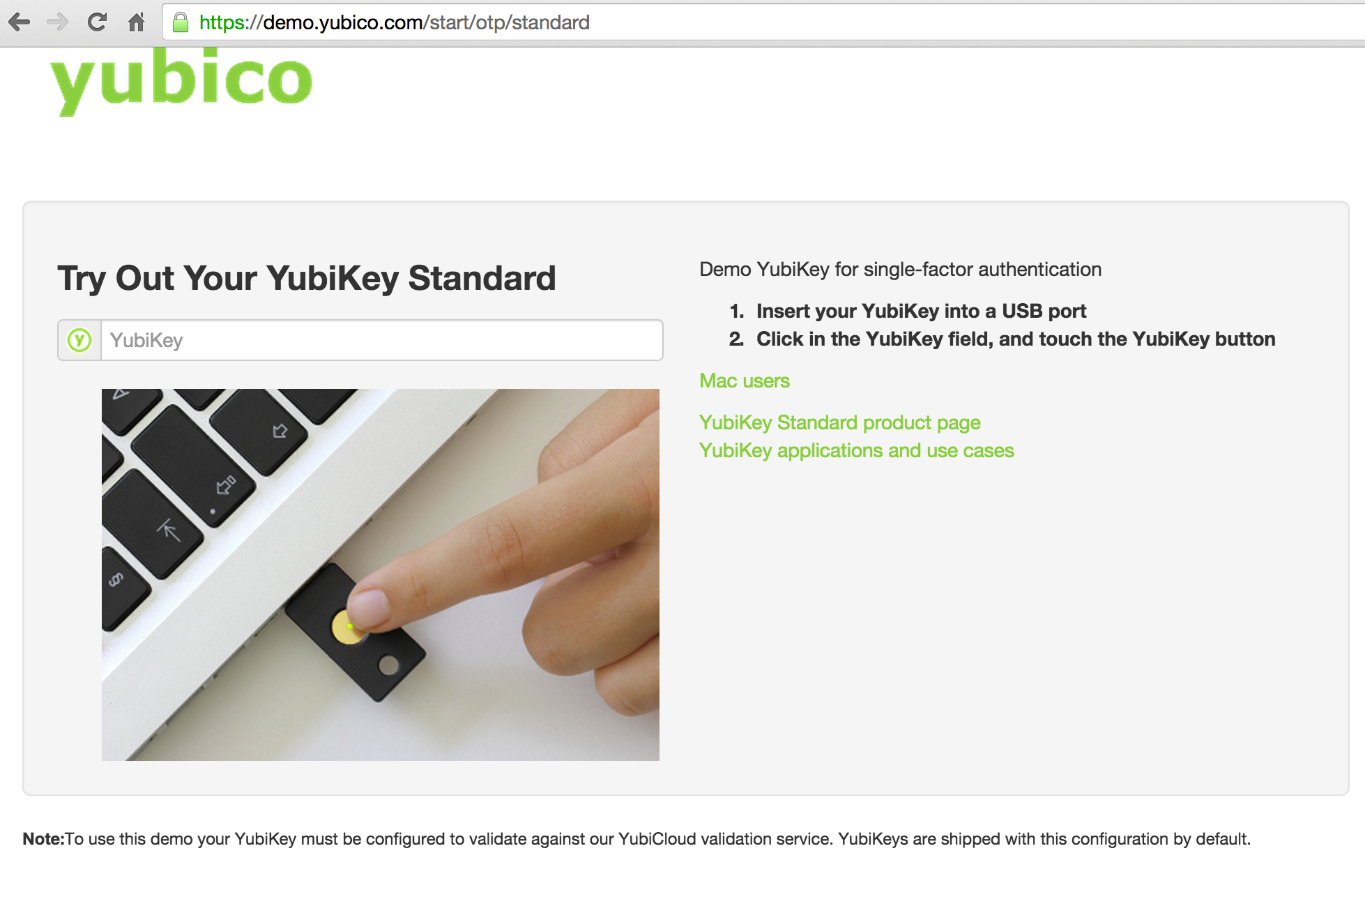
- Le système affichera alors les informations de la clé, dont le PublicId :
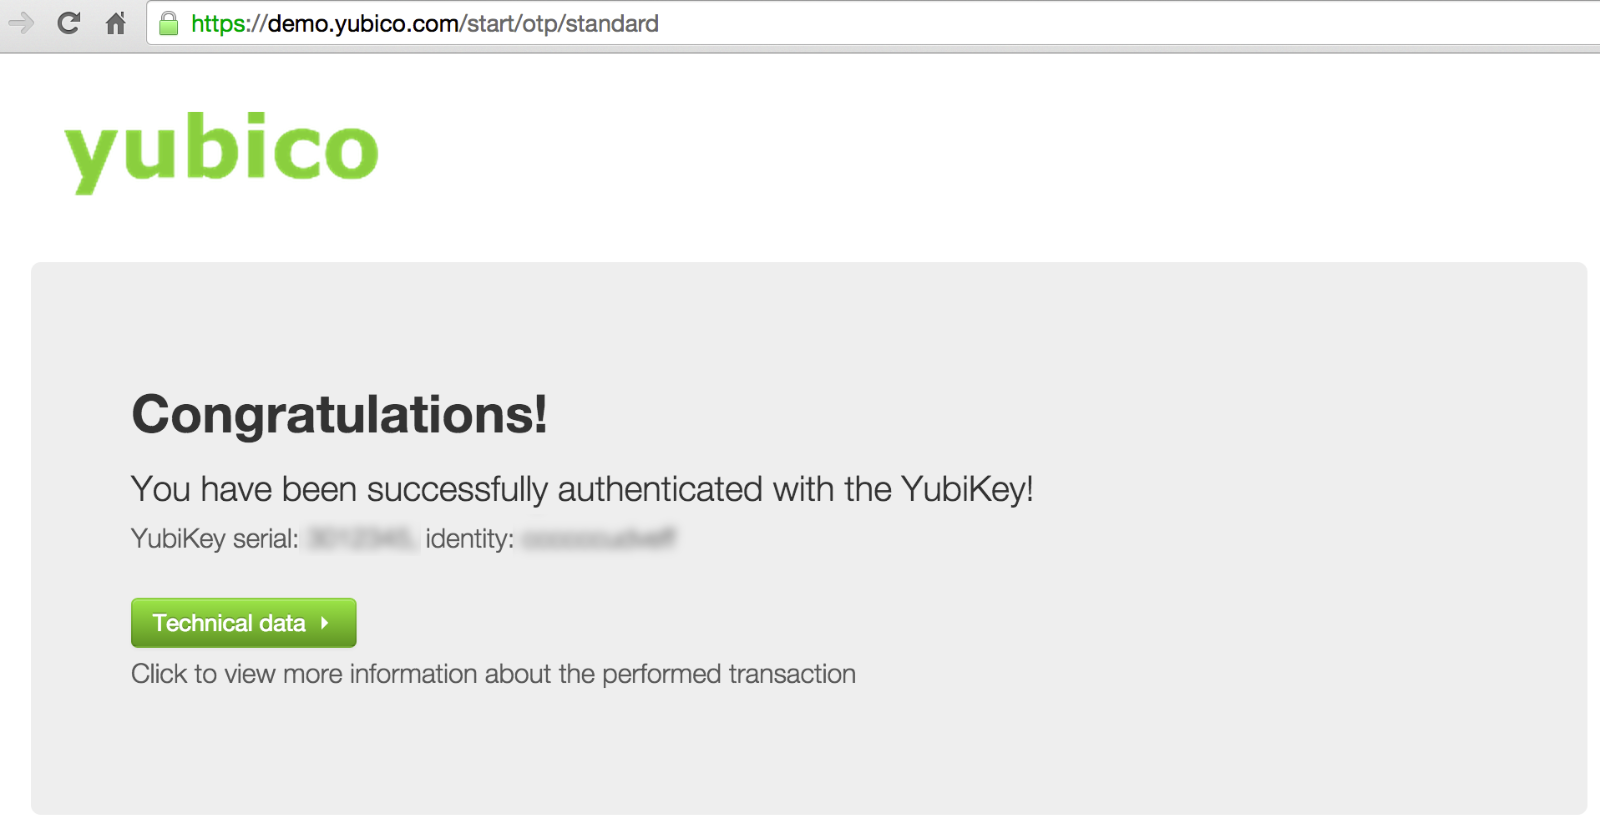
- Notez la valeur du champ Identity - c’est le PublicId de la clé.
Important : Le PublicId est une caractéristique unique et permanente de chaque clé Yubico. Il correspond généralement aux 12 premiers caractères de tout OTP généré par cette clé. Ce PublicId servira à associer de manière sécurisée chaque clé physique à un compte utilisateur spécifique dans votre système.
Sixième étape : Créer le fichier de correspondance entre clés et utilisateurs
Pour associer chaque clé Yubico à son utilisateur légitime dans votre système, vous devez créer un fichier de correspondance qui sera utilisé par le module d’authentification JAAS :
- Créez un fichier nommé
id2name_textfile.confdans le répertoire de configuration de votre serveur JBoss :
touch ${jboss.server.config.dir}/id2name_textfile.conf
- Éditez ce fichier pour y ajouter une entrée pour chaque utilisateur, en suivant ce format :
# Format: yk.<PublicId>.user = <login>
# Exemple pour un utilisateur nommé "john" avec une clé dont le PublicId est "ccccccbdtvth"
yk.ccccccbdtvth.user = john

# Exemple pour un utilisateur nommé "alice" avec une clé dont le PublicId est "vvdftghjkloi"
yk.vvdftghjkloi.user = alice
Cette configuration est essentielle pour la sécurité du système d’authentification. Elle garantit que :
- Seules les clés Yubico enregistrées peuvent être utilisées pour l’authentification
- Chaque clé ne peut être utilisée que par l’utilisateur auquel elle est associée
- Un utilisateur ne peut pas utiliser la clé d’un autre utilisateur pour s’authentifier
Note de sécurité : Dans un environnement de production, vous pourriez envisager d’utiliser une source de données plus robuste comme une base de données ou un annuaire LDAP pour stocker ces associations, particulièrement si vous avez un grand nombre d’utilisateurs.
Septième étape : Configurer le domaine de sécurité dans JBoss
Pour intégrer l’authentification Yubico à votre serveur JBoss/Wildfly, vous devez configurer un domaine de sécurité (security domain) spécifique. Voici comment procéder :
-
Ouvrez le fichier de configuration principal de votre instance JBoss :
- Pour une instance autonome :
$JBOSS_HOME/standalone/configuration/standalone.xml - Pour une instance en cluster :
$JBOSS_HOME/domain/configuration/domain.xml
- Pour une instance autonome :
-
Localisez la section
<security-domains>dans le sous-systèmesecurity:
<subsystem xmlns="urn:jboss:domain:security:1.2">
    <security-domains>
        <!-- Vos domaines de sécurité existants -->
- Ajoutez le domaine de sécurité Yubico suivant :
<security-domain name="yubico-auth" cache-type="default">
    <authentication>
        <login-module code="com.yubico.jaas.YubikeyLoginModule" flag="required" module="com.yubico">
            <!-- Remplacez ces valeurs par celles obtenues à l'étape 4 -->
            <module-option name="clientId" value="12123"/>
            <module-option name="clientKey" value="U873jhsYT629uuh7gban65+p2Io="/> <!-- client Key aka secret Key -->
            <module-option name="id2name_textfile" value="${jboss.server.config.dir}/id2name_textfile.conf"/>
        </login-module>
    </authentication>
    <mapping>
        <!-- Configuration des rôles - exemple simple -->
        <mapping-module code="SimpleRoles" type="role">
            <!-- Associe un rôle à un utilisateur identifié par son PublicId -->
            <module-option name="ccccccbdtvth" value="manager"/>
            <module-option name="vvdftghjkloi" value="admin"/>
        </mapping-module>
    </mapping>
</security-domain>
- Personnalisez cette configuration selon vos besoins :
- Remplacez
clientIdetclientKeypar les valeurs obtenues à l’étape 4 - Ajustez le chemin du fichier de correspondance si nécessaire
- Configurez les rôles appropriés pour vos utilisateurs
- Remplacez
Options avancées : Pour un environnement de production, vous pourriez vouloir :
- Utiliser un module de mapping plus sophistiqué pour récupérer les rôles depuis LDAP ou une base de données
- Ajouter un login module supplémentaire pour combiner l’authentification par mot de passe traditionnel avec l’OTP Yubico
- Configurer des options de cache pour optimiser les performances
Après avoir effectué ces modifications, redémarrez votre serveur JBoss pour appliquer la nouvelle configuration.
Huitième étape : Configurer votre application Java EE
Pour que votre application web Java EE utilise l’authentification Yubico, vous devez la configurer pour utiliser le domaine de sécurité que vous venez de créer. Voici comment procéder :
- Créez ou modifiez le fichier
jboss-web.xmldans le répertoireWEB-INFde votre application web :
<?xml version="1.0" encoding="UTF-8"?>
<jboss-web>
   <security-domain>yubico-auth</security-domain>
</jboss-web>
- Assurez-vous que ce fichier est bien inclus dans votre archive WAR lors du déploiement.
Cette configuration indique à votre application d’utiliser le domaine de sécurité Yubico que vous avez créé précédemment pour toutes les opérations d’authentification et d’autorisation.
Neuvième étape : Implémenter le formulaire d’authentification
Pour permettre à vos utilisateurs de s’authentifier avec leur clé Yubico, vous devez créer un formulaire de connexion adapté :
- Créez une page de formulaire de login (par exemple
login.jsp) avec les champs suivants :
<form method="post" action="j_security_check">
  <div>
    <label for="username">Nom d'utilisateur :</label>
    <input type="text" id="username" name="j_username">
  </div>
  <div>
    <label for="password">Token Yubico :</label>
    <input type="password" id="password" name="j_password">
  </div>
  <div>
    <input type="submit" value="Connexion">
  </div>
</form>
- Configurez les contraintes de sécurité dans le fichier
web.xmlde votre application :
<web-app>
  <security-constraint>
    <web-resource-collection>
      <web-resource-name>Zone sécurisée</web-resource-name>
      <url-pattern>/secure/*</url-pattern>
    </web-resource-collection>
    <auth-constraint>
      <role-name>admin</role-name>
      <role-name>manager</role-name>
    </auth-constraint>
  </security-constraint>

  <login-config>
    <auth-method>FORM</auth-method>
    <realm-name>Authentification utilisateur</realm-name>
    <form-login-config>
      <form-login-page>/login.jsp</form-login-page>
      <form-error-page>/error.jsp</form-error-page>
    </form-login-config>
  </login-config>

  <security-role>
    <role-name>admin</role-name>
  </security-role>
  <security-role>
    <role-name>manager</role-name>
  </security-role>
</web-app>
Note : Pour utiliser cette authentification, l’utilisateur devra :
- Saisir son nom d’utilisateur dans le champ
j_username - Placer le curseur dans le champ
j_password - Appuyer sur le bouton de sa clé Yubico pour générer un OTP qui sera automatiquement saisi dans le champ
Vous pouvez également configurer l’authentification en mode BASIC si cela convient mieux à votre application.
Dixième étape : Tester et déboguer l’intégration
Une fois toutes les étapes précédentes complétées, il est important de tester votre implémentation et de vérifier que l’authentification fonctionne correctement. Pour faciliter le débogage, activez le mode log verbeux dans votre configuration JBoss.
Voici un exemple de logs générés lors d’une authentification réussie :
TRACE [org.jboss.as.web.security]  Begin invoke, caller=null
DEBUG [org.apache.catalina.authenticator]  Security checking request GET /form-auth/
DEBUG [org.apache.catalina.authenticator]   Calling hasUserDataPermission()
DEBUG [org.apache.catalina.authenticator]   Calling authenticate()
DEBUG [org.apache.catalina.authenticator]  Save request in session 'bIbbT0CwH9ICDj-apERnL29O'
DEBUG [org.apache.catalina.authenticator]   Failed authenticate() test
TRACE [org.jboss.as.web.security]  End invoke, caller=null
TRACE [org.jboss.as.web.security]  Begin invoke, caller=null
DEBUG [org.apache.catalina.authenticator]  Security checking request POST /form-auth/j_security_check
DEBUG [org.apache.catalina.authenticator]  Authenticating username '<LOGIN_USER>'
DEBUG [com.yubico.jaas.YubikeyLoginModule]  Initializing YubikeyLoginModule
DEBUG [com.yubico.jaas.YubikeyLoginModule]  Trying to instantiate com.yubico.jaas.impl.YubikeyToUserMapImpl
DEBUG [com.yubico.jaas.YubikeyLoginModule]  Begin OTP login
TRACE [com.yubico.jaas.YubikeyLoginModule]  Checking OTP <XXXXXXXXXXXXYYYYYYYYYYYYYYYYYYYYYYYYYYYYYYYY>
TRACE [com.yubico.jaas.YubikeyLoginModule]  OTP <XXXXXXXXXXXXYYYYYYYYYYYYYYYYYYYYYYYYYYYYYYYY> verify result : OK
INFO  [com.yubico.jaas.YubikeyLoginModule]  OTP verified successfully (YubiKey id XXXXXXXXXXXX)
DEBUG [com.yubico.jaas.YubikeyLoginModule]  Check if YubiKey XXXXXXXXXXXX belongs to user LOGIN_USER
TRACE [com.yubico.jaas.YubikeyLoginModule]  In commit()
DEBUG [com.yubico.jaas.YubikeyLoginModule]  Committing principal <YubikeyPrincipal>XXXXXXXXXXXX
TRACE [org.jboss.as.web.security]  User: <LOGIN_USER> is authenticated
DEBUG [org.apache.catalina.authenticator]  Authentication of '<LOGIN_USER>' was successful
DEBUG [org.apache.catalina.authenticator]  Redirecting to original '/form-auth/'
DEBUG [org.apache.catalina.authenticator]   Failed authenticate() test ??/form-auth/j_security_check
TRACE [org.jboss.as.web.security]  End invoke, caller=null
TRACE [org.jboss.as.web.security]  Begin invoke, caller=null
TRACE [org.jboss.as.web.security]  Restoring principal info from cache
DEBUG [org.apache.catalina.authenticator]  Security checking request GET /form-auth/
DEBUG [org.apache.catalina.authenticator]   Calling hasUserDataPermission()
DEBUG [org.apache.catalina.authenticator]   Calling authenticate()
DEBUG [org.apache.catalina.authenticator]  Restore request from session 'bIbbT0CwH9ICDj-apERnL29O'
DEBUG [org.apache.catalina.authenticator]  Authenticated '<LOGIN_USER>' with type 'FORM'
DEBUG [org.apache.catalina.authenticator]  Proceed to restored request
DEBUG [org.apache.catalina.authenticator]   Calling accessControl()
TRACE [org.jboss.as.web.security]  hasRole:RealmBase says:true::Authz framework says:true:final=true
TRACE [org.jboss.as.web.security]  hasResourcePermission:RealmBase says:true::Authz framework says:true:final=true
DEBUG [org.apache.catalina.authenticator]   Successfully passed all security constraints
TRACE [org.jboss.as.web.security]  End invoke, caller=null
Dans ces traces, vous pouvez identifier les principales informations de l’authentification :
<LOGIN_USER>: le nom d’utilisateur saisi dans le formulaireXXXXXXXXXXXXYYYYYYYYYYYYYYYYYYYYYYYYYYYYYYYY: l’OTP complet généré par la clé Yubico et envoyé au service Yubico Cloud pour validationXXXXXXXXXXXX: le PublicId de la clé Yubico (les 12 premiers caractères de l’OTP)
Les messages clés à surveiller sont :
OTP verified successfully: indique que le token a été validé avec succès par le service Yubico CloudUser: <LOGIN_USER> is authenticated: indique que l’utilisateur a été authentifié avec succèsSuccessfully passed all security constraints: indique que l’utilisateur a les autorisations nécessaires pour accéder à la ressource demandée
Conclusion
L’intégration de l’authentification forte avec Yubikey dans vos applications JBoss/Wildfly renforce considérablement la sécurité de vos systèmes d’information. Cette approche à deux facteurs (nom d’utilisateur + token OTP) protège efficacement contre les attaques par hameçonnage, les fuites de mots de passe et d’autres menaces courantes.
La solution présentée dans ce tutoriel est particulièrement adaptée aux environnements d’entreprise où la sécurité des applications est primordiale. Elle peut être facilement étendue pour s’intégrer avec d’autres systèmes d’authentification existants comme LDAP ou les bases de données utilisateurs.
Liens utiles :
 Yubico OTP and JBoss EAP 6 or Wildfly 8
- Documentation du client Java Yubico
- Authentication Modules - JBoss AS 7.0
- JBoss AS7: Security : Custom Login Modules
- Creating Custom Login Modules In JBoss AS 7 (and Earlier)
Glossaire :
- OTP (One-Time Password) - Mot de passe à usage unique généré par un dispositif physique ou logiciel
- 2FA (Two-Factor Authentication) - Méthode d’authentification qui requiert deux types différents d’informations d’identification
- JAAS (Java Authentication and Authorization Service) - Framework Java pour l’authentification et l’autorisation des utilisateurs